PPUnix remote access
Direct logins using X are a problem because it's unencrypted; that means that your username and password go over the network visible to anyone bothered enough to look for them. The following set up avoids direct log-ins and demonstrates the set up of key based (passwordless) authentication.
SSH access through puTTY
The departmental Windows machines allow you to use PuTTY to connect to any of the interactive machines and use the command line. See the instructions in the "Using PuTTY from Windows" section.
Please note: Logins to pplxint8 and plxint9 use a single sign-on system with windows clients. You do not need a password if your username matches Windows and you are already logged in to a Windows system. This throws some people but is actually more secure as only your Windows machine ever needs to know your password.
To set up password-less log-in to the interactive linux machines or to Fermilab or CERN and other large research labs on your personally owned computer see This page
Fast Graphical session from anywhere
I recommend the "VNC-over-RDP-over-HTTPS" (on windows) and "VNC-over-RDP-over-SSH" method (on Linux) which enables logins using the long distance "RDP" protocol with encryption. Hashed Passwords can be saved in the graphical clients, but true key based password-less login is not possible. The speed increase is a mixture of RDP cleverness (including compression and caching) and because the image is rendered on the SL6 server before sending it (reducing round-trips and negotiations over long distances). SSH or HTTPS provide encryption for security.
But the real advantage is this: If you choose the same resolution and colour depth at home and at work, you can also re-connect to the same session on the interactive machines.
Using MSTC from Windows 7
If you are connecting from within the department, the first few sub-sections are enough. If you are connecting from home, read to the end of this whole section.
General settings
The MSTC remote desktop client comes as standard in all current windows versions. The recommended way to connect to Linux resources from Windows uses the RDP gateway.
Start -> All Programs
-> Accessories
-> Remote Desktop Connection
- A Window will pop up into which you may type the address of the terminal server (e.g. pplxintn.physics.ox.ac.uk )
- Fill in your own user name as shown
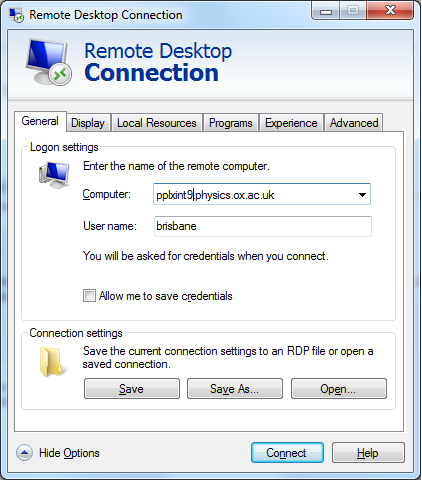 pplxint9 basic RDP settings
- On the display tab, select 16 bit colour.
- You may also choose to select a resultion. If you want to be able to re-connect to the same remote desktop session from a different machine, you must select the same resolution every time. If not, I recommend just selecting 'full screen'
 Linux RDP display settings
- Back on the overview page you can select 'Save As' to create a shortcut to this connection on your desktop.
- Double click this shortcut to log in.
Logging on the the Linux machine
- In the "Linux" login screen as shown below, use your pplinux username and password which is normally the same as your physics username and password. For some people who have been in the department a while, these will be different usernames and/or passswords but you know who you are!
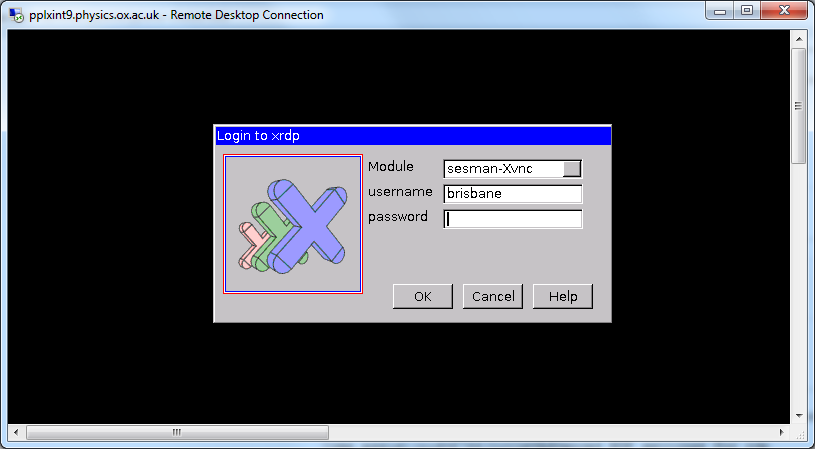 xrdp sessman login screen
- There is an odd bug where sometimes you need to type your password in twice before it connects. You will get 'Error, problem connecting' the first time you try to log on which will clear up the next time.
Advanced settings if connecting from a windows or OSX machine outside the department
If you are setting up your personal laptop or other external machine, you need to make some additional steps. You do not need this section if you are logging in from a desktop machine within the department.
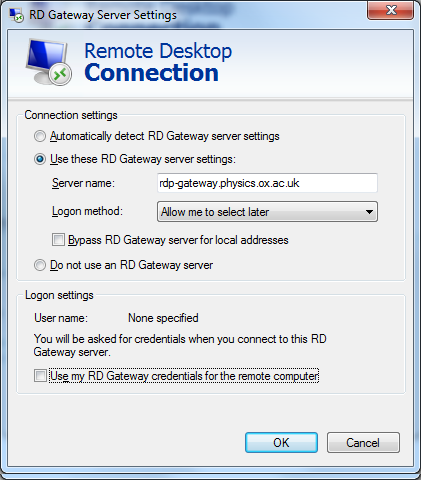
- Right click on the shortcut to the remote desktop connection you created above and click on "edit" on the menu that appears.
- Select the 'Advanced' tab
- Fill in the name of the rdp-gateway server as 'rdp-gateway.physics.ox.ac.uk'
- Deselect 'Use my credentials for the remote computer'
- While testing, Deselect "Bypass RD gateway server for local addresses"
[**]After completing this setup and having logged in once, you may choose to select this box again as the RDP geteway is not needed for some local addresses, but it is safer to leave it deselected initially. - An additional log-in box will appear as shown below. You need to use PHYSICS\\username for your username. You can also select "remember my credentials"
 Advanced RDP settings for the RDP gateway
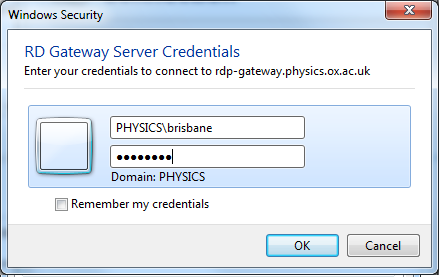 RDP gateway username
Further details
Further details are at the "Connect to your Physics Windows Desktop or Other Protected Machine From Outside The Department" section of this page. The list of workarounds and common issues may be more up to date there than here.
Using Remmina from Linux
The Remmina client is the Linux answer to MSTC. There are umpteen million ways to connect Linux-to-Linux, but this is about the fastest secure way to get a full graphical display.
Please see The "connecting from Linux/Unix" and "Connect to your Physics Windows Desktop or Other Protected Machine From Outside The Department" sections of this page for instructions on how to use the client.
Traditional way to connect from within the department
What follows is the "X-over-SSH" method which can be configured to allow passwordless (key-based) logins from within the department. The method suffers over long distances (i.e. connections from home)
Using PuTTY from Windows
It's fairly straightforward to run a full X session over SSH; the first step is to start an X server in passive mode For eXceed it's simply a matter of starting it.
Exceed can be configured using the xconfig option to always run in passive mode when you click the Exceed icon or, when it starts select the passive option.
Once that's done (the eXceed splash screen will appear and disappear) then you need to start PuTTY in the usual way. On Windows 7 desktops, eXceed can be found at start-->All Programs--> Open Text Exceed 14 x64 --> Exceed.

If you do not appear to have putty installed on your desktop the simplest option is to install a copy on your desktop yourself. On a departmental desktop, navigate to Start-->All Programs-->Physics Self service and select putty to install. Alternatively, google putty, which will find http://www.chiark.greenend.org.uk/~sgtatham/putty/ select the download page, click on putty.exe in the windows section, select the option to save the file, save it on your desktop. You can then start it up and configure it as below.
You need to set up a few options, this picture gives an overview of where to find them, but we'll go through them individually:
Enter the host name e.g. pplxint10.physics.ox.ac.uk and save this as pplxint10-kde.
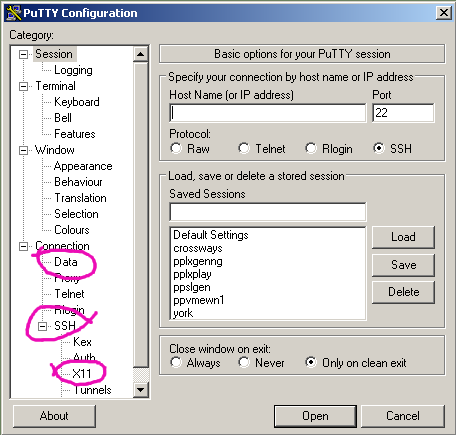
Firstly, we need to actually turn on X forwarding, under the SSH->X11 set of options:

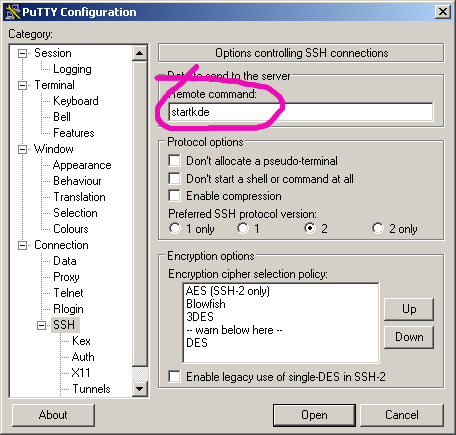
Then tell PuTTY that we want it to start a KDE session when we log in :
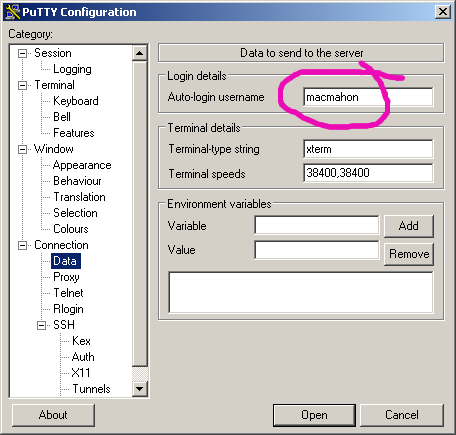
We should tell PuTTY what username to log us in with:
Finally, if you logged onto the Windows machine using your physics user name and password, or you have kerberos for Windows installed on your own PC, you will also want to enable automatic log on via GSSAPI, as shown in the image below. Be sure to enalble GSSAPI credential delegation and that you are running PuTTY >=0.63.
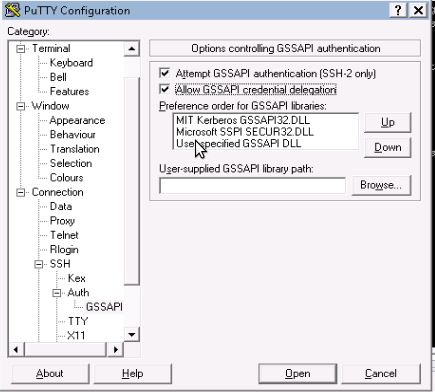 Use Putty with GSSAPI credential forwarding
Once that's all set up it makes sense to go back to the top level of PuTTY options and save those settings as a stored session - that way all we need to do next time is double-click the entry in the list, rather than set everything by hand again.
Once you have your session started up its a very good idea to open a terminal window and change the font to Fixed, as that improves scrolling performance no end. Then click the save options, so that all future windows will have the fixed fonts.
Using SSH from a Linux system
This is somewhat simpler - assuming that your local Linux system is running an X server already then you simply need to open a terminal and run:
ssh -X remote_machine.physics.ox.ac.uk
then any graphical programs that you start on the remote system will display on your local machine.
I recommend you also set the following options in your ~/.ssh/config file if you are using a departmental Linux machine to connect. These options will tell ssh to automatically log in. The delegate credentials gives the remote machine permission to completely impersonate you, without a password, by using the credentials you delegate. I would recommend only setting this when connecting to machines within physics.
One potential catch is that SSH sets the DISPLAY environment variable automatically on the remote end to point to itself - if your login scripts reset DISPLAY they will break the forwarding setup, so you need to ensure that they don't reset it if it's already been setup.