Formatting Intranet web content
The CMS text editor uses a language called BBCode for its formatting. This consists of tags in square brackets, such as [b]bold text[/b] for bold text. [b] is the start tag and [/b] is the ending tag, denoted by a forward slash.
![]()
Although you can type these codes yourself, we have included a set of editor buttons which can input the code for you.
Leading (intro) text
Any text you enter into the “Leading (intro) text” field will be larger and bold. Please keep intro text to just a sentence or short paragraph; the purpose of the intro text is to provide a short, attention-grabbing introduction to the page. By default it is limited to 255 characters
This field is optional, you can just use the Body field instead if you like.
Hierarchy
When creating a new content for example "page" it is placed by default as a child item of the editorial section (under which you add it). For example you create a new page "Test page" under About us section. This page is placed under About us. To move it within menu hierarchy of the editorial section:
- My Content (top-right next to your name) and select from the list an editorial section to which you have access e.g. About us.
- Find the item you want to move (item listed in the table), drag and drop item using icon (
 ) under new parent item
- Scroll down and click "Save configuration" button

If you want the page to appear/disappear in/from the section menu, on the above page amend option for an item under Enabled column. To store your settings click "Save configuration"
Headings
If your page has several sections, it is best to separate them using headings. For example:
As you can see, the different levels of heading are used to designate subsections within a section. For example, a blackberry is a type of berry, so it gets a level 3 heading underneath "Berries" which gets a level 2 heading.
To create a heading, simply type the name of the heading, then select it and click the "heading" button. You will be prompted to choose a heading level.
Formatting
The text editor has several options for formatting.
![]()
Bold
Italic
Underline
Strikethrough
Simply highlight the text you wish to format, and click the relevant button.
Images
When editing a page:
- Move the text cursor to where you want the image
- Click on the “Insert image” button (
 )
) - Click “Browse” to upload a new image in "Tag editor - IMG" window (or choose an existing image, then skip to step 6)
- In the "File Browser" window click "Upload" icon (top-left)
- Click the “Choose File” button, browse to your image and click "Open". If you want to create thumbnails of the image you are uploading use options available under "Create thumbnails", click "Upload" button. To upload more images repeat this step as many times as you need, to close this window click "x" (top-right).
- From the "File Browser" select image you want to embed and click "Send to editor" (top of the window) or just double click on the file name.
- In the "Tag editor - IMG" amend settings such as alignment, size. If you want to add caption to the image enter text in the "Title text" field e.g.: 'Image caption in normal text', or use "Label in bold: normal text"
- Click “Ok”
To make the embedded image showing in the same line as text remove class="" from the inserted img tag.
Attachments
When creating a page, you can attach files using the File Attachments/Upload files sections.
- Click on the "Choose file" button
- Navigate to the file you wish to upload
- Select the file and click "Open"
- Click "Attach"/ "Upload" to attach the file.
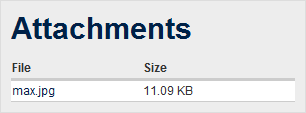
You can repeat this process for multiple attachments. When you have finished, and saved the page, the attachments will appear on the right-hand side of the page.
Make a link to the uploaded file
Below steps provide instruction to get link to the file from "Edit" content:
- When you editing content scroll down to "Upload files"/"File Attachment", expand it.
- Right click on the file name, "Copy link address".
- Now you can create link to this file following Links instructions (see below).
Important: if you upload new file that you want to link to make sure to save page first. Attached files are moved on page save from default location to one defined for the page type that is created (so the link to default file location now is invalid as the file has been moved after saving page).
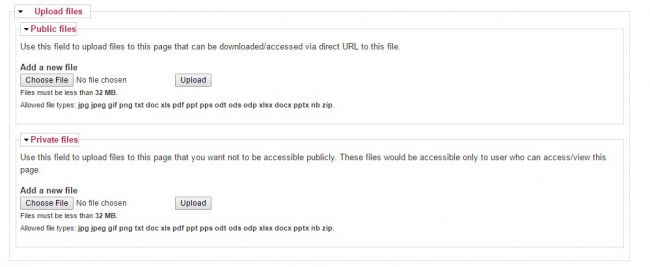
Public and private files
Public files ("Upload files" -> "Public files") that are attached to the content can be visible by anybody. To limit access to attached file use "Upload files" -> "Private files" and set "Privacy level" for the page. So if "Privacy level" is set to "Department of Physics" and a file is uploaded using "Private files" option this file is accessible only from device that is connected to Physics network (otherwise user trying to see it gets "Access denied" page).
Links
When editing a page:
- Highlight the text you wish to turn into a link
- Click “Insert/edit link” (
 )
) - Enter the desired URL (e.g. link to attached file) or email address in the “URL/Email” field. To add link to image file uploaded via "Insert image" click on the "Browse" button (see Images section above).
- Click “OK”
Lists
The easiest way to create a bulleted or numbered list is to type your list items like so:
Favourite fruits:
Raspberries Plums Cherries Blueberries Bananas Mangoes
Then, highlight your list and click either numbered list (![]() ) or bulleted list (
) or bulleted list (![]() ).
).
Please note that lists are just for text; if you put images inside lists, the page layout may break.
Items in lists are denoted by "[*]" (one per line).
You can add sub-items to lists. For example:
Results in:
- Level 1
- Level 2
- Level 3
- Level 4
- Level 3
- Level 2
Tables
You can create a simple table using the table button (![]() ).
).
You will be prompted to enter the column names for your table, in a comma-separated list- for example:
Product Name, Product No., Price, Quantity
the table will be created with a dummy value for each column, for example:
Replace the text "Column1, Column2, Column3, Column4" with your own field values. You can add as many extra rows as you like, with each on a separate line like so:
| Product Name | Product No. | Price | Quantity |
|---|---|---|---|
| Apple | 65535 | £0.40 | 1 |
| Pear | 65536 | £0.45 | 3 |
Please note: these tables are designed for simple bits of text. Complex content such as images will not work within tables.
Because the values in the table are comma-separated, you cannot use commas in your table cell contents as the site will interpret it as an extra cell. For example, this list of films:
Toy Story, Shrek, Monsters, Inc.
would be seen as four items.
If you still need to use commas in the table cells content replace all commas with html encoded character, for example:
Result:
| Description | number |
|---|---|
| item name, additional text | 2 |
Collapsible sections
Collapsible sections will fold up to only show the heading for that section. For example:
To add a collapsible section, highlight the content you want to collapse, then click on the Collapse button (![]() ).
).
Video
Videos from Youtube and Vimeo can be embedded into the CMS pages.
To do so:
- Copy the URL of the video page (e.g. http://www.youtube.com/watch?v=xdhLQCYQ-nQ)
- Paste the URL into the CMS editor field
- Highlight the URL
- Click “Video” (
 )
)
Code
The "Code" feature can be used to display BBCode tags without them being interpreted. For example, this code:
would render like so:
Jack and Jill went up the hill
To use this tag, simply highlight the text you wish to display in code and click the Code button (![]() ).
).
Formulae
Formulae can be inserted into pages using LaTeX, a typesetting language.
For example, the code [latex] would result in the following: [/latex]

Video Tutorials
There are also a few web tutorials which cover editing content on the Physics website.
Categories: Web